Amazon EC2 for Windows
Windows on Amazon EC2
Getting Started with Windows on Amazon EC2
This lab will walk you through launching, configuring, and customizing a web server on Amazon EC2 Windows using the AWS Management Console.
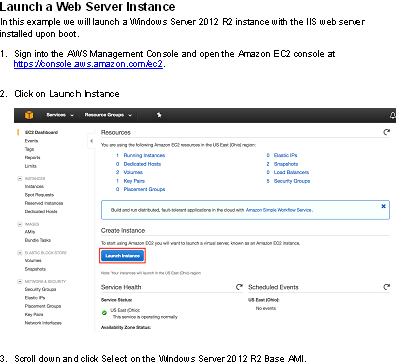
Launch a Web Server Instance
In this example we will launch a Windows Server 2019 Base instance with the IIS web server installed upon boot.
-
Sign into the AWS Management Console and open the Amazon EC2 console at https://console.aws.amazon.com/ec2.
-
Click on Launch Instance
-
Scroll down and click Select on the Windows Server 2012 R2 Base AMI.

-
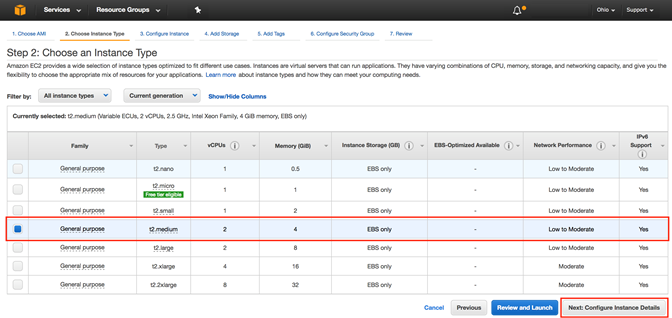
In the Choose Instance Type tab, select the t2.medium instance size and click Next: Configure Instance Details
-
On the Configure Instance Details page, keep all the predefined settings as they are. Expand the Advanced Details section, copy/paste the following script into the User Data field.

<powershell>
Import-Module ServerManager;
Install-WindowsFeature Web-Server -IncludeManagementTools -IncludeAllSubFeature
remove-item -recurse c:\inetpub\wwwroot\*
(New-Object System.Net.WebClient).DownloadFile("https://immersionday-labs.s3.amazonaws.com/ec2-windows.zip", "c:\inetpub\wwwroot\ec2-windows.zip")

$shell = new-object -com shell.application
$zip = $shell.NameSpace("c:\inetpub\wwwroot\ec2-windows.zip")
foreach($item in $zip.items())
{
$shell.Namespace("c:\inetpub\wwwroot\").copyhere($item)
}
</powershell>
You can also reference the script from: https://immersionday-labs.s3.amazonaws.com/ec2-windows-lab-userdata.txt Copy/paste the script into the User Data field (this PowerShell script will install/start IIS and deploy a simple web page)
For further information on User Data please refer to the documentation at - http://docs.aws.amazon.com/AWSEC2/latest/WindowsGuide/ec2-instance-metadata.html.
Click Next: Add Storage:
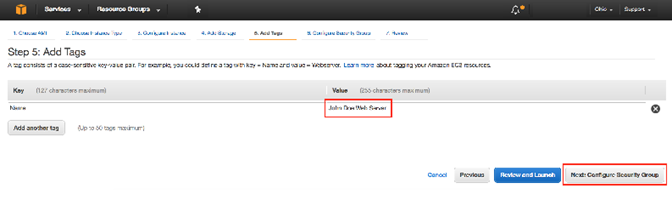
On the Step 4: Add Storage screen, Click Next: Add Tags to accept the default Storage Device Configuration and move to the Step 5: Add Tags screen.
Next, choose a “friendly name” for your instance. This name, more correctly known as a tag, will appear in the console once the instance launches. It makes it easy to keep track of running machines in a complex environment. Name yours according to this format: “[Your Name] Web Server”.
Then click Next: Configure Security Group.
For further information on Tags please refer to the documentation at - http://docs.aws.amazon.com/AWSEC2/latest/UserGuide/Using_Tags.html.
- You will be prompted to create a new security group, which will be your firewall rules. On the assumption that we are building out a Web server, name this security group according to this format “[Your Name] Windows Web Server”. Add the following rules:
- Type: RDP; Source: My IP
- Type: HTTP; Source; Anywhere
-
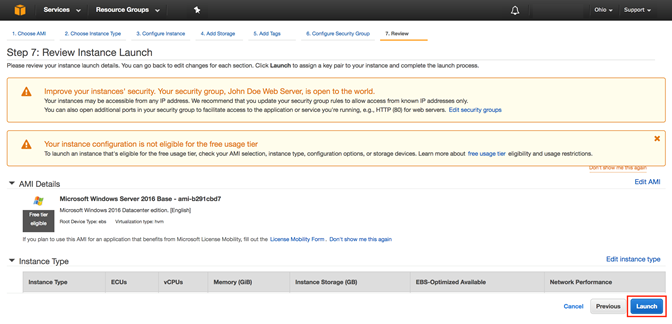
Review your choices, and then click Launch. Note the two warning boxes at the top of the page, these are to warn you about possible configuration issues. In this lab we are creating a Windows server that has RDP access that is “open to the world” this is something that you wouldn’t normally do.
-
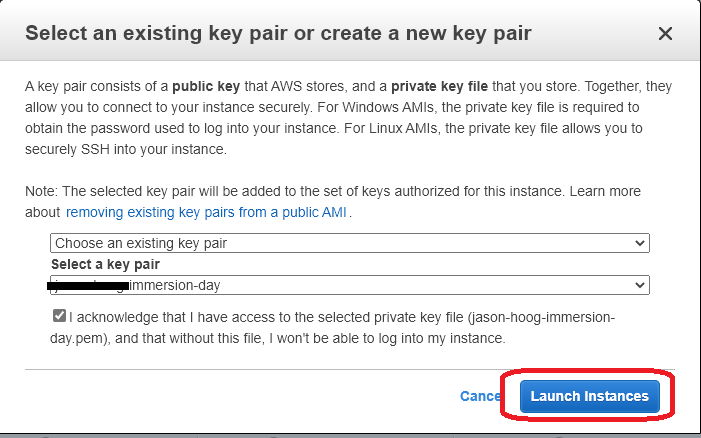
Select the existing key pair that you created earlier. When this instance launches, you will connect to it via Remote Desktop using the credentials for “administrator”. For Windows instances, EC2 automatically generates a password and encrypts with your public key. To decrypt the encrypted password, you will use your private key. Now click the Launch Instances button to launch your Windows web server.
-
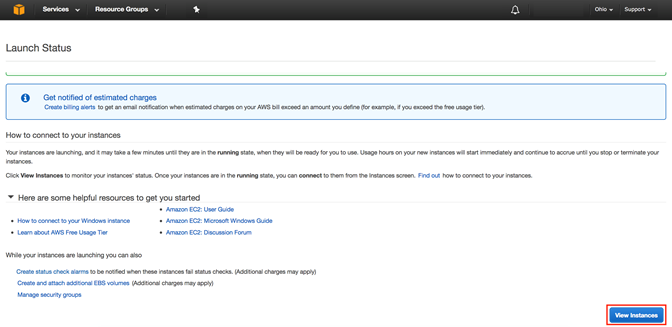
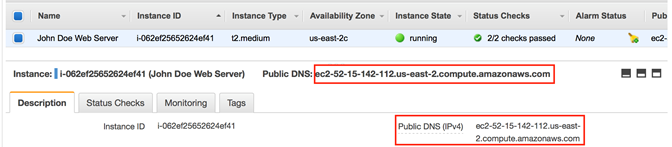
The next screen will confirm that your instance is now launching. Click the View Instances button. Once your instance has launched, you will see the “[Your Name] Web Server” instance as well as the Availability Zone the instance is in and its publicly routable DNS name.
Browse the Web Server
Now you will browse to the Web Server site that was installed on the Instance using the PowerShell script defined in the User Data section during creation of the instance.
- Wait for the instance to pass the Status Checks. For Windows instances, this could take up to 20 minutes.

When complete, you will see the Status Checks have passed.

The Status Checks will not pass until the User Data scripts (aka “bootstrapping” scripts) have completed successfully. Because this includes installation of IIS, this can take a few minutes.
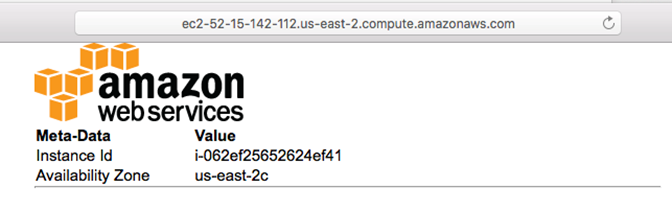
- Open a new browser tab and browse the Web Server by entering the EC2 instance’s Public DNS name into the browser. The EC2 instance’s Public DNS name can be found in the console by reviewing the “Public DNS” column. You should see a page that looks similar to this:
Great Job: You have built your first web server!
Connecting To Your Windows Instance
To connect to the Windows desktop, we will use a RDP client. If you’re using a Windows PC, use the bundled Remote Desktop application. For Mac users, if you don’t have a RDP client already installed, download Microsoft Remote Desktop.
-
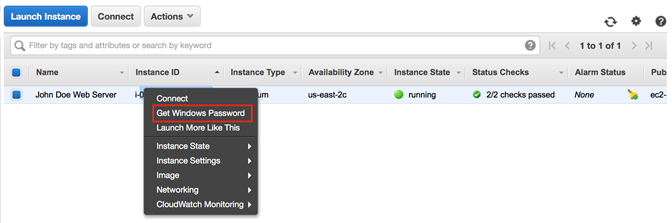
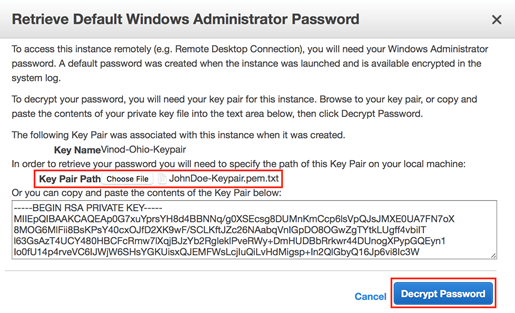
Retrieve the automatically generated, encrypted Windows password by right clicking your instance and selecting Get Windows Password.
-
On the next screen, click the Choose File button and select the private key file that was automatically downloaded earlier when you launched the instance. Then click Decrypt Password to obtain the Administrator password.
-
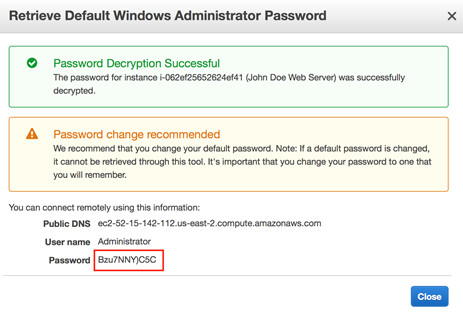
The decrypted Administrator password should look something like this:
Note that since only you have the private key, it’s important to understand the automatically generated password can only be decrypted by you. So it’s important to keep this key secure. Generally, the automatically generated password is changed by the customer after first login. If the automatically generated password is not changed and the private key is lost, there’s no way to recover the password.
-
Start your RDP application and connect to the hostname of your instance. The hostname can be found in a couple of different places. For example, in the web console, you’ll see hostname listed as the Public DNS of the instance.
-
In your RDP application, use Administrator as the username along with the decrypted password. Once connected, you will have access to the Windows desktop. At this point, feel free to explore Windows. You should change the Administrator password to something friendlier or easy to remember (but still secure of course).
Appendix – Additional EC2 Concepts
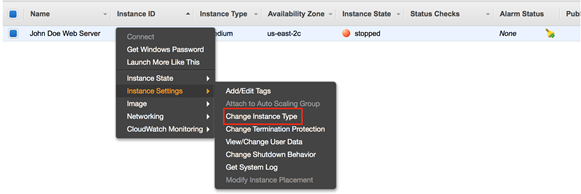
Change the Instance Type
Did you know that you can change the instance type that an AMI is running on? This is very useful when you need a larger (or smaller) or perhaps different type of instance to run a workload. This only works with EBS-backed instances (what we’re running here). There is no particular reason to change the instance type in this lab, but the following steps outline how easy it is to do in AWS.
-
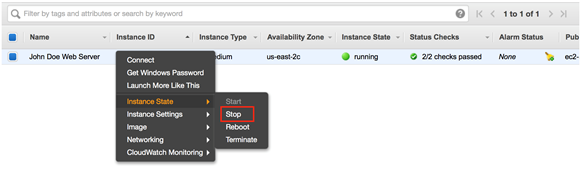
In the AWS Console, select your lab instance, then right-click on it and hover over Instance State and select Stop (NOT Terminate). Then select Yes, Stop to confirm.
-
After it has stopped, right-click on it again, hover over Instance Settings and select Change Instance Type.
-
After going through the options and selecting your new instance type, right-click your lab instance and select Start.
Elastic IPs
How do you set up practical DNS names for your web server? Using an address such as http://ec2-75-101-197-112.compute-1.amazonaws.com/ is cumbersome. Setting up a DNS record that points to http://www.yourdomain.com is easy enough – until you reboot the server and the underlying DNS name and IP address both change.
AWS offers Elastic IP (EIP) Addresses, which are actually NAT addresses that operate at a regional level. That is, an Elastic IP Address works across Availability Zones, within a single region.
Assign an EIP to your Web Server as follows:
- Sign into the AWS Management Console and open the Amazon EC2 console at https://console.aws.amazon.com/ec2.
- Click on the Elastic IPs link in the left hand panel of the AWS EC2 Console.
- Click Allocate New Address, then click Yes, Allocate at the prompt, then click Close. We will now associate the address with your Web Server instance. If you change instances, it’s as simple as allocating the address to the new instance.
- Select the EIP in the console and then click Actions | Associate Address.
- In the instance field select the Web Server instance you previously created, then click Associate.
You can now create a DNS “A” record in your own DNS server that points www.yourdomain.com to the EIP IP Address you created.
Two Important Notes:
- As long as an Elastic IP address is associated with a running instance, there is no charge for it. However, an address that is not associated with a running instance costs $0.01/hour. This prevents address hoarding; however, it also means that you need to delete any addresses you create, or you will incur an ongoing charge.
- Load balancing requires CNAME records instead of “A” records. So Elastic IP is not required for load-balanced applications.
Advanced Bootstrapping
There are a number of advanced techniques that offer additional power and flexibility when booting instances. For example, some organizations maintain a series of generic instances, and customize the images upon launch.
Common techniques include:
- Automatically check for updates upon each boot.
- Looking in a well-known location, such as in a S3 bucket, for data or a script to tell the instance which packages to load.
- Pass User Data to the instance to accomplish each of the above, or possibly instead of the other approaches.
For more details on User Data please refer to - http://docs.aws.amazon.com/AWSEC2/latest/WindowsGuide/ec2-instance-metadata.html.