Storage on AWS Lab
Amazon S3 Overview
Amazon Simple Storage Service (S3) provides a simple web services interface that can be used to store and retrieve any amount of data, at any time, from anywhere on the web. This lab is designed to demonstrate how to interact with S3 to store, view, move and delete objects.
This lab will walk you through the following:
• Creating a bucket in S3
• Adding an object to the S3 bucket
• View the object in S3
• Move the object in S3
• Enable bucket versioning
• Delete the object and the bucket in S3
Create a Bucket in S3
To upload your data (photos, videos, documents etc.) to Amazon S3, you must first create an S3 bucket in one of the AWS Regions. You can then upload your data objects to the bucket. Every object you store in Amazon S3 resides in a bucket. You can use buckets to group related objects in the same way that you use a directory to group files in a file system.
Note: You are not charged for creating a bucket; you are only charged for storing objects in the bucket and for transferring objects in and out of the bucket.
Transfer IN does not incur a charge, but Transfer OUT does. Data transfers are free if you are within the same region and within the same availability zone, and use a private IP address. Data transfers to other regions or services will have a cost associated with them. See https://aws.amazon.com/s3/pricing/ for more details.
- Sign into the AWS Management Console and open the Amazon S3 console at https://console.aws.amazon.com/s3.
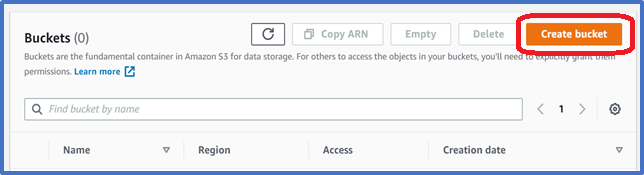
- Click Create Bucket. The Create a Bucket wizard will open.
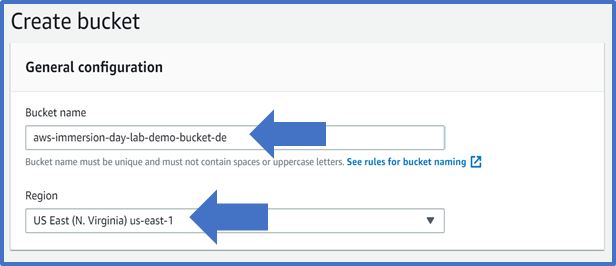
The bucket name you choose must be unique across all existing bucket names in Amazon S3. One way to do that is to prefix your bucket names with your organization’s name.
Bucket names must comply with the following requirements. The bucket name:
- Must be unique across all of Amazon S3
- Must be between 3 and 63 characters long
- Must not contain uppercase characters
- Can contain only lower-case characters, numbers, periods, and dashes
- Must Start with a lowercase letter or number
- Must Not contain underscores, end with a dash, have consecutive periods, or use dashes adjacent to periods.
- Cannot be formatted as an IP address (198.51.100.24).
There might be additional restrictions on bucket names based on the region your bucket is in or how you intend to access the object. Once you create a bucket, you cannot change its name. In addition, the bucket name is visible in the URL that points to the objects stored in the bucket. Make sure the bucket name you choose is appropriate.
-
In the Region drop-down list box, select a region. Choose a Region close to you to minimize latency and costs and address regulatory requirements. Objects stored in a Region never leave that Region unless you explicitly transfer them to another Region
-
Under Advanced settings, you have the option to enable Object Lock. Object Lock stores objects using a write-once-read-many (WORM) model to prevent objects from being deleted or overwritten for a fixed amount of time or indefinitely. For today’s lab, we will leave this disabled. Learn More
-
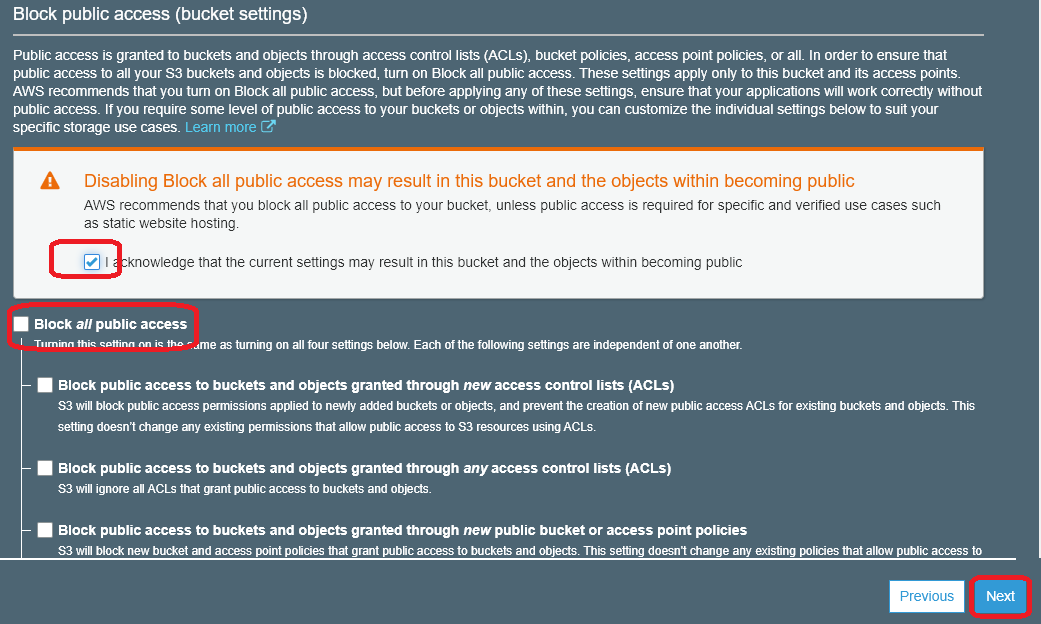
By default, all buckets are set to “block public access”. We are going to uncheck this for the lab purpose. However, in a typicaly production scenario, you only need to do this for specific use cases, so it is not recommended unless you know what you are doing!
-
Click Create Bucket to create your bucket.

-
Once your bucket is created, you will be able to see it in your Buckets list. You can also see the region your bucket is in along with the access type.
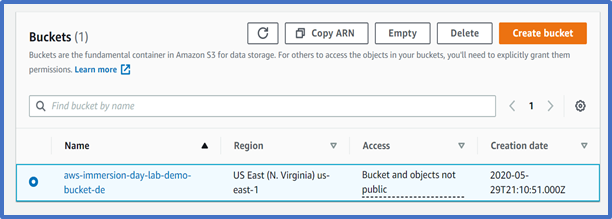
Well done – you have created your first bucket in Amazon S3!
Add an Object to a Bucket
Now that you have created a bucket, you are ready to add an object to it. An object can be any kind of file: a text file, a photo, a video and so forth. When you upload a file to Amazon S3, it is stored as an S3 object. Objects consist of the file data and metadata that describes the object. You can have an unlimited number of objects in a bucket. Learn More
-
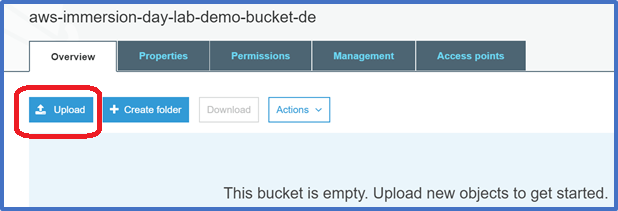
In the Amazon S3 console, click the on the name of the bucket that you want to upload your folders or files to. This should be the bucket you just created.
-
Choose Upload.
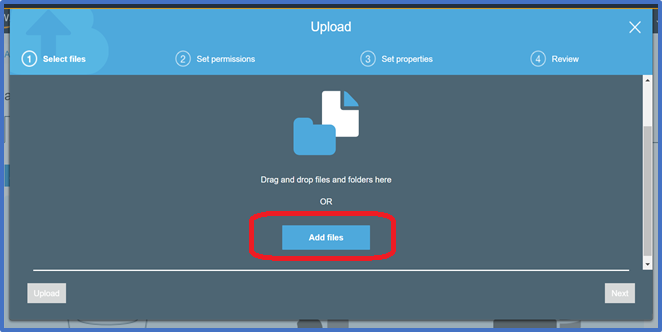
-
In the Upload Dialog box, Choose Add Files. You may need to use the scroll bar on the right to scroll down to see the Add Files button.
-
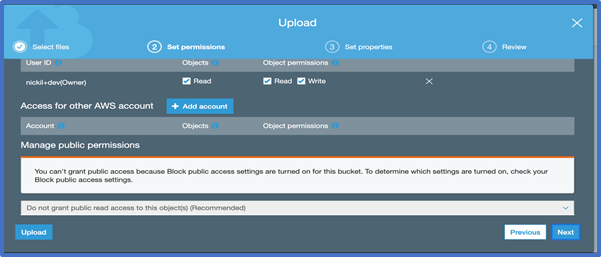
Choose one of more files from your computer to add. For this lab, you can choose any file or picture you have available on you laptop. Click Next three times to set permissions or properties for the files that you are uploading. You can look at these to see what options are available. For today’s lab, we will use the default permissions. We will be using the standard storage option. To learn more about Amazon S3 storage classes Click Here
-
Click Upload. You can watch the progress of the upload at the bottom of the screen.
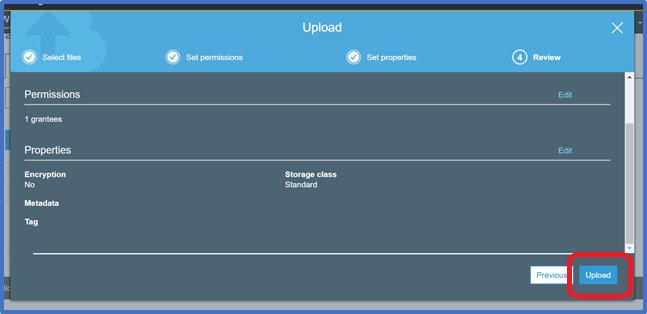
This bar appears as soon as the upload begins. Once the object has been uploaded, you will see a Success Message.

Good work - you have added a file to your bucket!
View an Object
Now that you have added an object to a bucket, you can open and view it in a browser.
By default, your Amazon S3 buckets and objects are private. To view an object using a URL, for example, https://s3.amazonaws.com/Bucket/Object the object must be publicly readable. Otherwise, you will need to create signed URL that includes a signature with authentication information.
Bucket access permissions specify which users are allowed access to the objects in a bucket and which types of access they have. Object access permissions specify which users are allowed access to the object and which types of access they have. For example, one user might have only read permission, while another might have read and write permissions.
Bucket and object permissions are independent of each other.
-
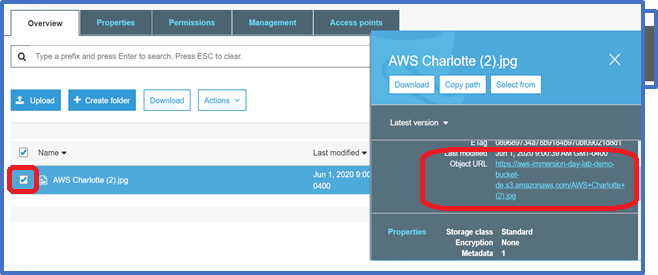
Select the name of the file you uploaded. A pop up window will appear. Click on the object URL.
-
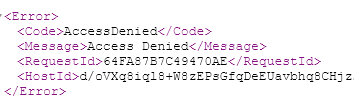
You will receive an error message that access is denied. That is because our object is not publicly accessible.
-
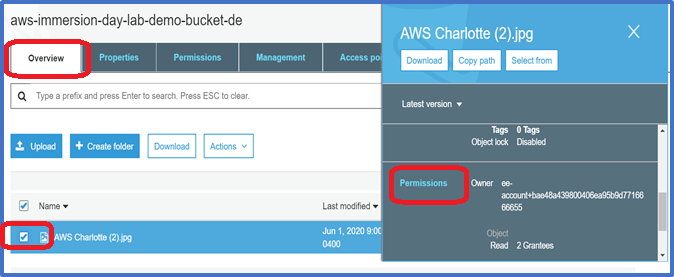
Select the object by checking the box in front of your object. Click on overview. A pop up window appears on the left. Scroll down until you see Permission. Click on Permissions.
-
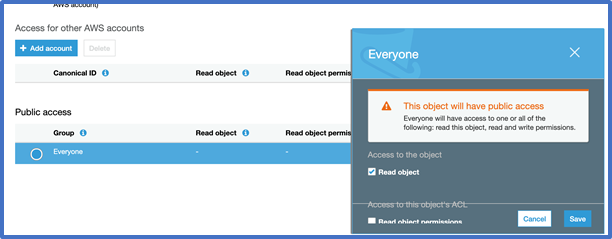
Scroll down and click on Everyone and check read object. You should see the following message pop up. Click Save.
-
Click on the Overview tab. Scroll down and click on the Object URL. You should now be able to see your object.
Good job – you have retrieved your object from S3 via the web!
Move an Object
Now that you have added an object to a bucket and viewed it, you might like to move the object to a different bucket or folder. In this example, we will use the move operation to move one or more objects from one bucket to another bucket.
-
In the Amazon S3 console, create another bucket. Follow the same instructions you did earlier.
-
Select the first bucket you created.
-
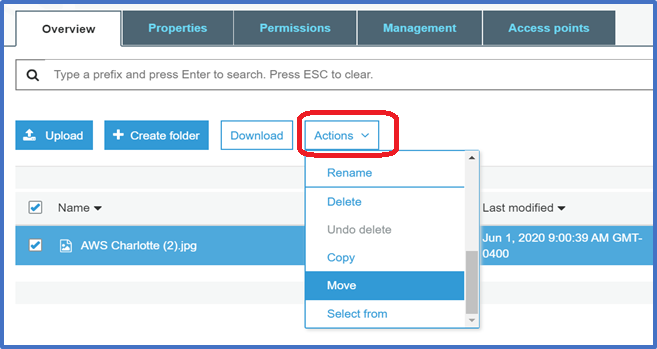
Select the object(s) you want to move by clicking the selection box to their left. You can ignore the window that pops open when you select an object.
-
Once you have selected your file, click on the Actions button, and then click Move
-
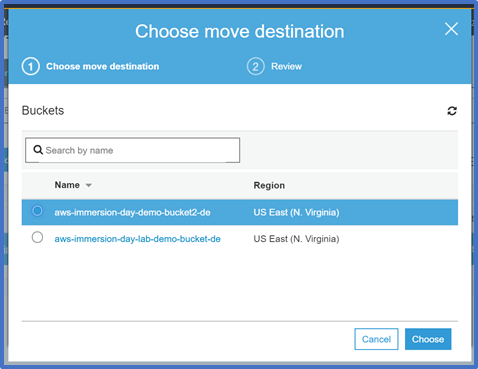
Select the location to which you want to move the object. Then Select Choose. Verify the information is correct. Then select Move.
You can verify that you original bucket is now empty. The file will be in the new bucket.
Congratulations - you have now moved an object between buckets.
Enable Bucket Versioning
If you want to add new version of the object to the same bucket but want to retain the old version, you can turn on bucket versioning.
-
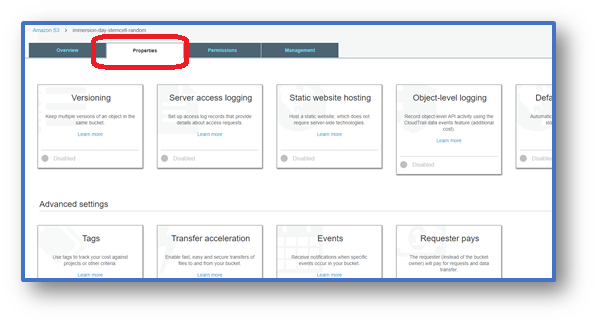
In the S3 Console, click on the bucket name. Then select the Properties tab.
-
Click on the Versioning tile, select the Enable versioning radio button, and then click Save.
-
Choose an object that you are able to edit on your computer, and upload it using the steps from the Add an Object to a Bucket section above.
-
Now open the original file on your computer and edit it, saving the updated version under the same file name.
-
Upload this updated file to the S3 bucket in the same way as before.
-
Now click on the object’s link in the S3 bucket and click on the words Latest version (to the right of the object’s name).
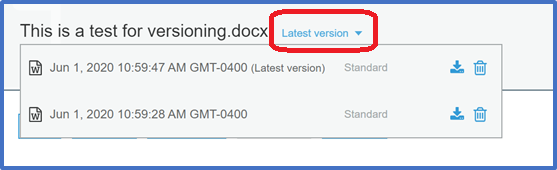
This shows the different versions of the object in the bucket. You can click on the download icon next to each version of the object to download that version.
Well done - you have now uploaded 2 different version of the same document.
Delete an Object and Bucket
You have added an object to a bucket, viewed it, and moved it. Now, you can delete it and the bucket it is in. If you no longer need to store the objects you uploaded and moved while going through this guide, you should delete them so you do not incur further charges on those objects.
-
In the Amazon S3 console, click on the link representing the bucket containing the object(s) you want to delete. Then select the checkboxes for the object(s) you would like to delete.
-
Click the Actions button. Then select Delete. To confirm the action in the Delete objects dialogue, click Delete.
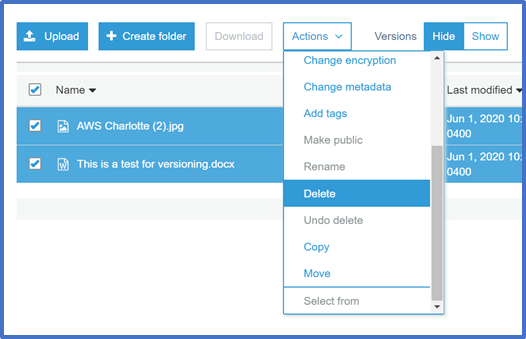
-
If you deleted one or more objects from a bucket in which versioning is enabled, select the Show option next to Versions to see that the older versions of the deleted objects still exist.
-
You can then select the checkboxes for the older versions of the objects, click Actions and then Delete to delete the older versions.
-
Navigate back to the S3 console and select the bucket icon of the bucket you want to delete (not the link to its right), and at the top of the page, click Delete. Confirm the deletion by typing its name verbatim at the Delete bucket prompt.
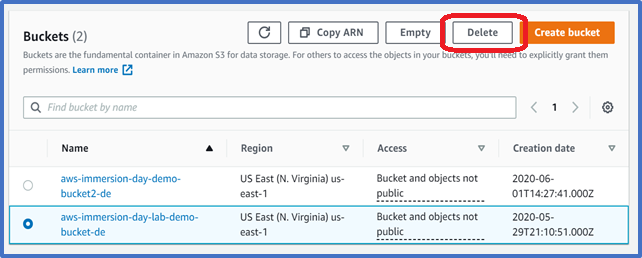
To delete a bucket, you must first delete all of the objects in it. If you haven’t deleted all of the objects in your bucket, do that now.
Well done, your bucket is now deleted!
Copying files with the AWS CLI
The AWS CLI is a command line interface that allows you to perform API actions against AWS services. In this section, we are going to use the S3 API to copy files from one bucket to our EC2 instance that we created earlier, and then copy those back into another bucket.
In the midst of this, we will run into a challenge with the size of our disk and will have to increase the size of the disk on our EC2 instance.
-
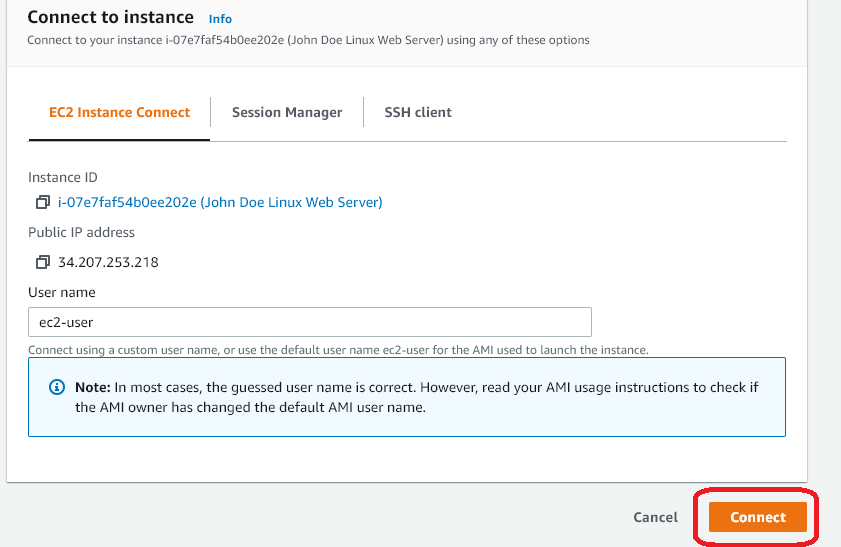
Go to the Amazon EC2 console. Select “Instances” and select the checkbox next to your Linux instance that you created earlier. Select the Actions menu and choose “Connect”

-
Under “EC2 Instance Connect”, choose the “Connect” button. This allows us to use a browser based SSH client to connect to our instance instead of needing a shell terminal or Putty.
-
Once your connection is successful, type the following command to list all the buckets in your AWS account.
aws s3 ls

- Next, enter the following command to copy files from another public data set.
mkdir events
cd events
aws s3 cp --recursive s3://gdelt-open-data/events/ .
You will see the files being downloaded to your EC2 instance. However, we used the default size of 8GB for our root disk, so at around the 8 GiB mark, you should get an error similar to the following:

-
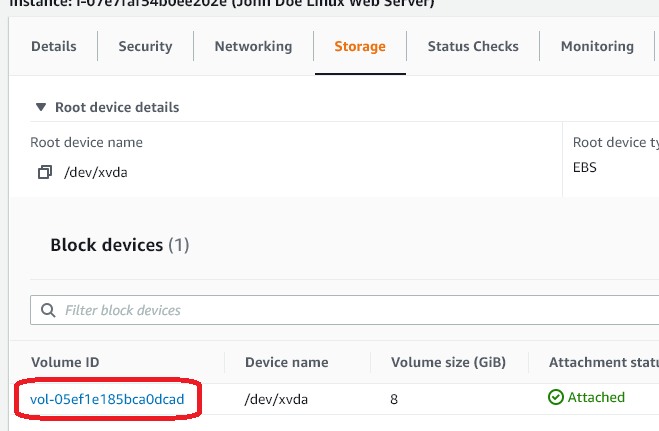
Press CTRL-C to stop the copy command. Then go to the Amazon EC2 console and find your Linux instance again. CLick the checkbox next to it and go to the Storage section and click on the Volume ID (this is the disk that is attached to the EC2 instance).
-
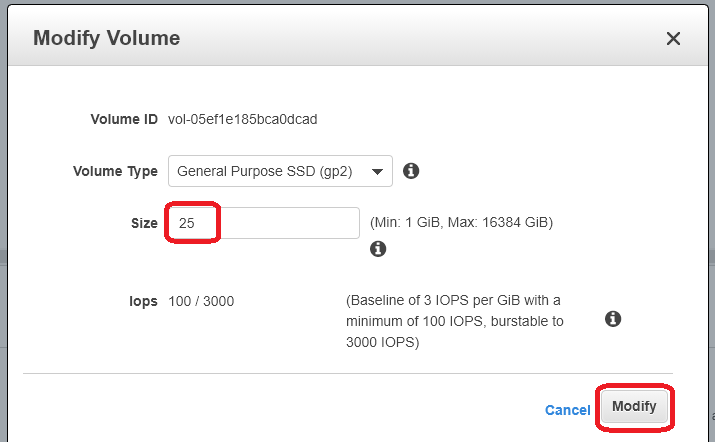
From the Volume screen, select Actions and choose “Modify Volume”. Change the size to 25 (GB) and select “Modify”.
-
Click “Yes” on the next screen to confirm you want to modify the volume.
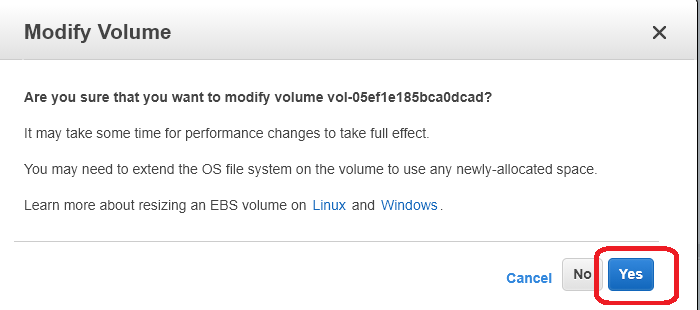
It is import to read this screen, as different file systems behave differently when resizing EBS. Typically you will have to extend a Linux file system after resizing a volume.
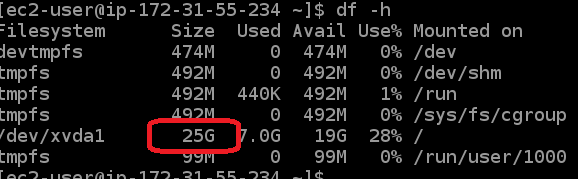
- Now, return to your SSH connection in the browser and issue the following commands to extend your Linux file system.
df -hT
lsblk
sudo growpart /dev/xvda 1
lsblk
df -h
sudo xfs_growfs -d /
df -h
You should now see that the size has been extended to 25GB, all without rebooting your server!
- Now, you can re-run your S3 copy command to continue downloading your files: (This may take a while, so we put in an extra command to only include files from the 1900’s)
cd events
aws s3 cp --recursive --exclude "*" --include "19*" s3://gdelt-open-data/events/ .
- Finally, let’s push our files into our own S3 bucket! You will need to replace your-bucket-name with the name of your S3 bucket.
cd ..
aws s3 cp --recursive ./events s3://<your-bucket-name>/my-events/
Conclusion
In this lab you have learned the basic operations to manage the lifecycle of an S3 object. First, you created a bucket, which is the logical container of objects. Then by uploading, viewing, moving an object, and enabling versioning, you learned the basic operations of the object itself. Finally, you learned how to delete both an object and a bucket.
You can also access S3 from the AWS CLI or the API
Click here for CLI Information
Click here for API information
You should continue exploring more features of S3!
- Did you know you can host a website entirely on S3?
- Did you know you can define automated lifecycle policies?
- How about fine-grained access control with Bucket Policy?